Converting Movies Into VCD/SVCD/DVD Compliant Video Basic Guidelines
Introduction:
This is a very basic introductory walkthrough on how to convert videos into a compliant video form. Now you are probably asking “Why bother? The video works on my computer so if it ain’t broken why fix it?”. A number of reasons here, are a few:
· I
am a big believer of KISS (Keep It
Simple Stupid). When I
want relax and watch a video, I want to pop it into my standalone DVD/VCD
player and it plays. That’s
it. No loading this or that
or worrying about codec this and codec that. I don’t want to waste five or ten minutes figuring out why I
have sound and no video
or video with no
sound. I just want it to
work.
· Although, I maybe a technical nerd, but
someone like my mother is certainly not. So, if I find a cool Chinese movie like Internal
Affairs for her, there is no way in hell I will be be able to tell her “how to
browse for the file” yea
right. I think I would
have a hard enough time telling her how to change language to Cantonese on a
DVD. So, something like a VCD for
her would be perfect. Put
the disk into the dvd player, close the door, and it works. Otherwise, I maybe wasting
countless hours providing telephone tech support for a product that wasn’t even
made by me.
· Standards
are a good thing. If we look
at music and the internet when file sharing was the big news. Everyone was swapping music all
over the world. The reason
why it took off so fast because almost everyone shared MP3s. Sure where were some WAV, WMA, and AIFF and etc., but
the defacto standard of MP3 took over and made it so even the non-techno nerd
can use the internet to get the music they wanted. Why don’t they do that for video? I betcha, greed and vanity has something to do with
it.
So this FAQ is designed
as the most common way that the average person would be using this TMPGENC
program. There are
exceptions which I will cover in another file and some most common errors which
are located at the bottom of this file.
The BASIC TMPGEnc
Guide
Procedure:
1. Start
up TMPGEnc and open the Wizard.
(If you have closed it, it is located under File->Project Wizard).
2. Here
do we select what format to create. VCD, SVCD or DVD are going to be the most typical that you will choose as a
beginner. What is the
difference? In a nutshell, good quality, better quality, and best
quality.
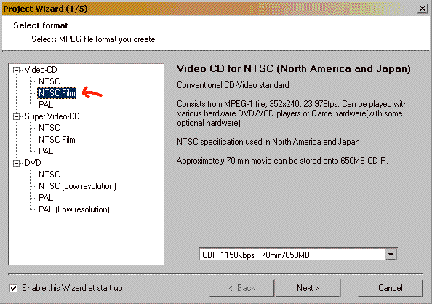
3. Select
the one marked Select Video-CD – NTSC for
our example. It is located
above the entry marked by the red arrow in the picture above.
4. Click
on the NEXT button to continue to the next step.
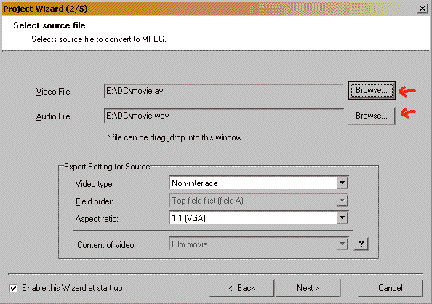
5. In
this second step of five steps, TMPGENC is asking where are the video and audio
files that need converting.
We will start with the “Video File” first. Click on the Browse button for the video file marked
by the top red arrow in the diagram above. Locate your movie and it will be added here.
6. Now,
under NORMAL circumstances, the audio file line will be autiomatically filled
in for you. If it isn’t then
it is not in a format that TMPGENC likes.
You will need to use Virtualdub to rip the audio out of the movie. See my FAQ on how to do this
before proceeding.
7. If
you have a different audio file ripped to wav, you can browse and choose that file the same way you did for
video except of course it is the next line as marked by the second red arrow
above.
8. After
you specified these two things, you can ignore the rest on the page and just
press NEXT to go to proceed.
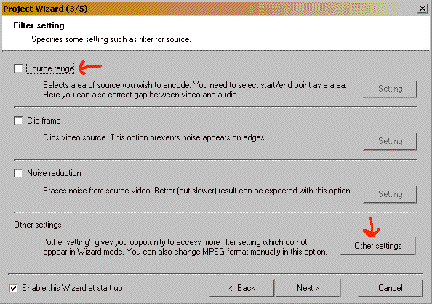
9. Alright, step 3 out of 5 is for setting
any special filters. The first one
allows you to segment the video up.
If your movie is less than 70 minutes long for a VCD, then you can
ignore this step. If you
movie is over 70 minutes, then your VCD needs to be broken up into 2 (or more)
smaller pieces.
a) First
select Source range, as marked by the red arrow in the diagram above.
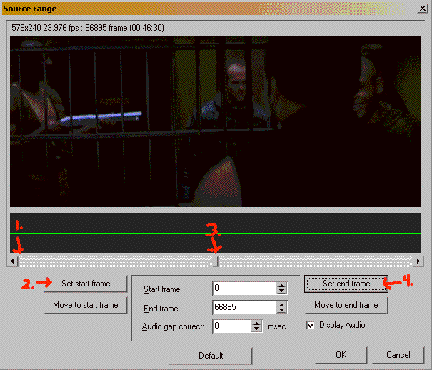
b) Now
a Source range page comes up as shown above. , as marked by the red arrow in the diagram above. (side note: If this is for the second half of the movie skip ahead to
step (9f). But for first timers,
just keep reading.
c) On the diagram marked by a red (1.),
there will be drag box.
Click and drag this box till you hit about half way through the movie
marked by the red (3.)
d) Click
on the “Set End Frame” which is marked with a red (4.) If you look at the top of the
dialog box, it will say how many frames you have selected between the start and
end frame and how many minutes it comes out to. Just check that it is under 70 minutes and you can press ok
to go to the next step.
If not, repeat the previous
steps (9c) and (9d) again until the time is under 70 minutes.
e) Please
note this end frame number because you will need this number, when you need to
encode the second half. If
this is your first pass for the first half of the movie, you proceed to step
10. If this is your second
pass, for the second half of the movie, go to the next step (9f).
f) When
you do the second half, you will
just type this number in the start frame box.
g) Click
on the “Set Start Frame” which is marked with a red (2.).
h) If
you look at the top of the dialog box, it will say how many frames you have
selected between the start and end frame and how many minutes it comes out
to. Just check that it is under 70
minutes and you can press ok to go to the next step. If not, repeat the previous steps (9c) and (9d) again until the time
is under 70 minutes. Your movie
will need more than 2 pieces, maybe 3 or 4 pieces (Lord Of the Rings Movies) are an example of this.
i) If this second part of the movie is good
enough to complete the movie then you are done, you can proceed to the next
step (10). If the movie is so long you need a
third slice or even a fourth slice, then you will have to note this end frame
number because you will need this number, when you need to encode the third
half. Continue with FAQ and
then come back to repeat steps (9f) to (9i) as many times as necessary to get
the entire movie.
10) The
other commonly used filter used in the Filter Dialog box is located under the Other
Settings. Click on this button as marked ( 2 diagrams above).
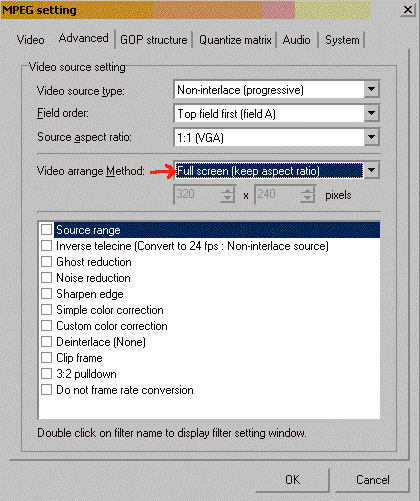
11) The
MPEG Setting dialogue box will
appear as shown below. Now,
for begineers, you only really to check one thing. Click on the second tab labeled “Advanced”.
12) On this page, change the Video arrange
Method to Full screen (keep aspect ratio) so the movie
will look exactly the same as the original video source. See red arrow in the diagram
below.
13) As for the rest you can leave it
alone. There is also
the ability to fix some of the sound like boosting the volume under the audio
tab. But for beginners, you
can skip that and press OK to
return back to the filter window.
14) Ok,
we can proceed to the next step,
press NEXT at the bottom of the “Filter” dialog window.
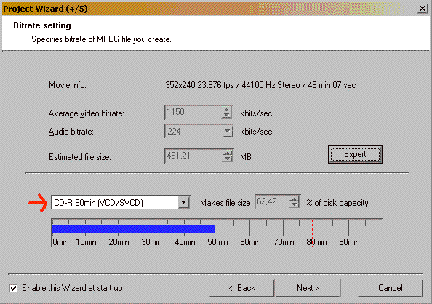
15) Ok,
step 4 out 5, is more of a visual check that your VCD will actually fit on a
disk, Select CD-R 74min or 80min
depending on what media you are going to burn on. 80min means that you can fit
near 80 min on a 80min CD and 74 min on a 74min CD. So, chances are, it will fit so, you can just proceed and
click Next. Otherwise click
Back and do some cutting as in step (9) to make it fit.
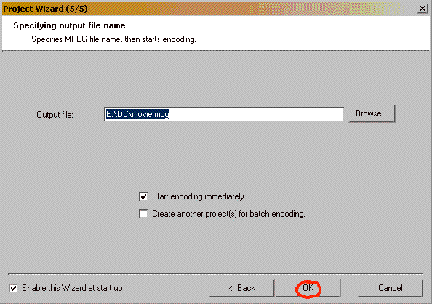
16) Ok,
the last of the steps, page 5 of 5. On this page, is where you want to save the
file. If the default
name is fine then you can press OK.
17) Repeat
everything to encode the other part(s) if needed. Refer to step (9) about cutting a movie into 70 minute pieces.
18) Test
the movies to make sure the run ok.
The resulting *.mpg files will play in Windows Media Player.
19) Use your favourite burning program like
Nero to burn it to VCD,
SVCD or DVD.
=================================================
Problems and Tips:
So, I have just given
you the basic template and procedure to do a typical AVI movie into VCD. Now, with the video swapping
world the way it is, with nobody deciding on a standard, you are bound to run
into a problem sometime. So
I will list a couple of the most common TMPGEnc problems:
· If
you get an error message when opening like file unsupported
· can
not open file
· file is not supported
· you
get an empty(black) video preview window
· video
looks wierd in the video preview window like green or purple or pink
The problem here is that
TMPGENC doesn’t know how to decode the video properly. It needs a codec adjustment. Maybe even needs a special codec.
First thing to try is to go to TMPGENC,
under Option->Environmental settings->VFAPI plug-in
and right click on the DirectShow Multimedia File Reader
and increase the priority to 2 or to the top of the plugin-list and try reopen
the video.
If that does not help be
sure that you have installed DivX or XviD or
MPG2 or DV Codecs. Try running
Gspot or AVIcodec to figure out what codec is missing. I will list a couple of the more common
ones here and what it will need.
To convert from DivX/XviD video you have to install a DivX/XviD
Codec, you may need both DivX 3.11 and the DivX 4 or 5.
To convert
from MPEG2/SVCD/DVD videos you may need the MPEG2
Plugin or a MPEG2
Codec/Player.
To convert
from DivX/XviD with AC3 Audio install the AC3
ACM Decompressor.
To convert
from MKV
install the matroska
/ MKV Codec.
To convert
from OGM
install the OGG
Vorbis DirectShow filter/ OGM Codec.
To convert from DV video you may need to install the Panasonic
DV Codec.
· No
audio
· Audio
sync problems
· Audio
sounds funny
Try to convert the audio to WAV audio using
Virtualdub. Then use the WAV as audio source. (TMPGEnc
can't handle VBR MP3 and AC3 that well).
· TMPGEnc
freezes
· TMPGEnc
crashes when converting
· An Unexpected decimal point calculation
Error
· An
Illegal floating decimal point calculation order
Write error
occured at address 77F83AED of module "ntdlll.dll"
Try first to change the directshow codec
reader priority settings in TMPGEnc under Option->Environmental
settings->VFAPI plug-in and right click on the DirectShow
Multimedia File Reader and increase the priority to 2 or
to the top of the plugin-list and try reopen the video.
If that doesn't help try repair/fix the
video source. The AVI may
have suffered some corruption. Try DvixFix or feed it through Virtualdub to try
to repair it.
· TMPGEnc
says Can't load P3Package.dll or P4Package.dll
Be sure that you have exctracted all
files in the tmpgenc download zip file to a folder then go to that folder and
start tmpgenc.exe or make a shortcut to tmpgenc.exe and it should work.
Try to copy the
p3package.dll and p4package.dll to your windows\system32 folder and restart
TMPGEnc.
· TMPGEnc
says that the video time / runtime is way too long
· TMPGEnc keeps encoding after the end of
video with only a black screen
Try change the
directshow reader priority, in TMPGEnc under Option->Environmental
settings->VFAPI plug-in and right click on the DirectShow
Multimedia File Reader and increase the priority to 2 or
to the top of the plugin-list and reopen the video.
If that doesn't help try
convert the audio to WAV audio
before converting and use the wav as audio source.
And if all that didn't help you can
always use the source range to select exactly what to encode, under Settings->Advanced
in TMPGEnc.
· How
do I encode several video files to one MPG video file?
· Can
I open several video files with TMPGenc?
· How
do I open an image sequence (DCP_0001.JPG, DCP_0002.JPG,DCP_0003.JPG ...)?
In TMPGenc under Option->
Environmental setting-> General, check the box for
"Open sequence files as a movie". And then rename your movie source
files like video1.avi, video2.avi,
video3.avi (same name but with a number at the end) and all
will be opened at once with TMPGEnc. Note that all files must have same video
and audio settings.
· How
do I convert video with AC3 audio?
Install the AC3 ACM Compressor and you
can convert AC3 audio.
· I
cannot change any settings
· Settings
are greyed out after I open a template
Load your VCD,SVCD or DVD template or
use the wizard as usual, then load the unlock template that you find in the
extra folder in the templates folders. Now you should be able to change every
setting. You can also right click on the setting word and choose Unlock.
· TMPGEnc
takes away the widescreen
· video
looks stretched
Be sure to select under
Settings->Advanced under Video Arange Method: Full Screen(Keep aspect
ratio).
· trouble
opening WMV files
Try and rename it to .asf
and open it.
If that doesn't help try
to change the directshow codec reader priority settings in TMPGEnc under Option->Environmental
settings->VFAPI plug-in and right click on the DirectShow
Multimedia File Reader and increase the priority to 2 or
to the top of the plugin-list and try open the video.
· problem
opening DV AVI files
First install a DV Codec
and be sure that you can play DV AVI with Media Player. Then try change the directshow reader
priority, in TMPGEnc under Option->Environmental settings->VFAPI
plug-in and right click on the DirectShow Multimedia File
Reader and increase the priority to 2 or to the top of the
plugin-list and reopen the video.
If that doesn't help you may need to
convert the DV to Canopus
reference DV (TMPGEnc do not support Microsoft DV AVI 1).
· Converting
a fullscreen movie from a widescreen movie
If the source is in WideScreen and you
want it to be in FullScreen you just select under Settings->Advanced under
Video Arange Method: No margin(keep aspect ratio)
and TMPGEnc will then cut left and right so it will fit FullScreen.
· trouble
open MPG/MPEG2/SVCD/DVD files
If you have Installed the PowerDVD 4+ demo
and use TMPGEnc 2.57+
and you should be able to open MPEG2.
Try install the MPEG2 plugin
for TMPGEnc.
Or Try and use the DVD2AVI method (note
DVD2AVI do not convert the MPEG2 to AVI it only frameserves it to TMPGEnc)
· problem
open DV video, DC30+,MJPEG captured video
· any
AVI VFW
Then try to change the settings in
TMPGEnc under Option->Environmental settings->VFAPI plug-in
and right click on the AVI VFW and increase the
priority to 2 and try reopen the video.
· Improve
the audio quality
TMPGEnc’s Audio Utilities actually
really sucks. I recommend
using virtualdub to extract the audio as a WAV. The use your favourite editor like CoolEdit to fix up
the sound or boost up the volume and etc… Then use that when re-encoding.